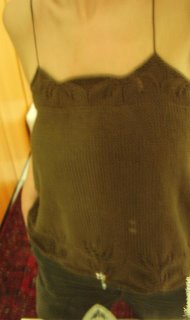
Beaded Cami
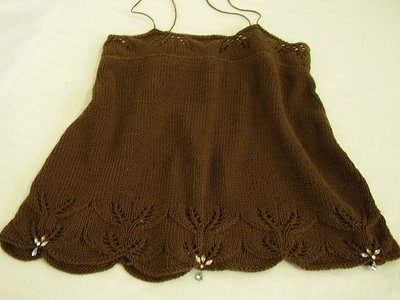
:: Cami is flared (A-line)
:: For a seamless version, knit it in the round.
To adapt pattern from straight needles to circulars, work the RS rows as written, but reverse the WS rows by reading from R to L and working the opposite sts.
Eg: for straight knitting the patt reads:
Row 2 (WS): P3, *P7, P2tog tbl, P2, YO, K1, YO, P2, P2tog, P7; rep from * to last 3 sts, P3.
For circular knitting the row should read:
Row 2 (WS): K3, *K7, K2tog, K2, YO, P1, YO, K2, SSK, K7; rep from * to last 3 sts, K3
 Materials
Yarn: Jo Sharp Summer DK Cotton Col:225 x 5 balls; 50g . 100m (109y) per ball
Ndls: 4mm (US 6)
Tension 6 sts and 7 rows = 1"
Measurements
Bodice (top) 17" across
Centre 20" across
Bottom (hem) 21" across
Length approx 18"
Cami: front
CO 121 sts – 115 sts will form 5 patt reps with 3 extra sts per side (23 sts = 1 patt rep)
K 2 rows
Row 1 (RS) K3, *K8, K2tog, YO, K1, P1, K1, YO, SSK, K8; rep from * to last 3 sts, K3.
Row 2 P3, *P7, P2tog tbl, P2, YO, K1, YO, P2, P2tog, P7; rep from * to last 3 sts, P3.
Row 3 K3, *K6, K2tog, K1, YO, K2, P1, K2, YO, K1, SSK, K6; rep from * to last 3 sts, K3.
Row 4 P3, *P5, P2tog tbl, P3, YO, P1, K1, P1, YO, P3, P2tog, P5; rep from * to last 3 sts, P3.
Row 5 K3, *K4, K2tog, K2, YO, K3, P1, K3, YO, K2, SSK, K4; rep from * to last 3 sts, K3.
Row 6 P3, *P3, P2tog tbl, P4, YO, P2, K1, P2, YO, P4, P2tog, P3; rep from * to last 3 sts, P3.
Row 7 K3, *K2, K2tog, K3, YO, K4, P1, K4, YO, K3, SSK, K2; rep from * to last 3 sts, K3.
Row 8 P3, *P1, P2tog tbl, P5, YO, P3, K1, P3, YO, P5, P2tog, P1; rep from * to last 3 sts, P3.
Row 9 K3, * K2tog, K4, YO, K5, P1, K5, YO, K4, SSK* rep from * to last 3 sts, K3.
Row 10 P3, *P11, K1, P11; rep from * to last 3 sts, P3.
Row 11 K3, *K11, P1, K11; rep from * to last 3 sts, K3.
Row 12 Rep row 10.
Rep rows 1 – 12  Shape body: front
Row 1 (RS) K3, SSK, K to last 5 sts, K2tog, K3
Rep this 1st row every 5 rows until 13 sts in total dec on each side… 95 sts on ndle.
Dec 1 more st on whichever side you prefer… 94 sts rem.
Work straight for 4 rows (lengthen here if req'd). Bind off.
There should be approx 60 rows bet the end of the 2nd patt rep (hem) and the BO at the top (bodice) before you add the top lace.
Front bodice – this part will form the top bodice - 94 sts: 4 patt reps and 2 sts (1 per side).
K 2 rows.
Row 1 (RS) K1, *K8, K2tog, YO, K1, P1, K1, YO, SSK, K8; rep from * to last 3 sts, K1.
Row 2 P1, *P7, P2tog tbl, P2, YO, K1, YO, P2, P2tog, P7; rep from * to last 3 sts, P1.
Row 3 K1, *K6, K2tog, K1, YO, K2, P1, K2, YO, K1, SSK, K6; rep from * to last 3 sts, K1.
Row 4 P1, *P5, P2tog tbl, P3, YO, P1, K1, P1, YO, P3, P2tog, P5; rep from * to last 3 sts, P1.
Row 5 K1, *K4, K2tog, K2, YO, K3, P1, K3, YO, K2, SSK, K4; rep from * to last 3 sts, K1.
Row 6 P1, *P3, P2tog tbl, P4, YO, P2, K1, P2, YO, P4, P2tog, P3; rep from * to last 3 sts, P1.
Row 7 K1, *K2, K2tog, K3, YO, K4, P1, K4, YO, K3, SSK, K2; rep from * to last 3 sts, K1.
Row 8 P1, *P1, P2tog tbl, P5, YO, P3, K1, P3, YO, P5, P2tog, P1; rep from * to last 3 sts, P1.
Row 9 K1, * K2tog, K4, YO, K5, P1, K5, YO, K4, SSK* rep from * to last 3 sts, K1.
Row 10 P1, *P11, K1, P11; rep from * to last 3 sts, P1.
Row 11 K1, *K11, P1, K11; rep from * to last 3 sts, K1.
Row 12 Rep row 10.
Row 13 K
Row 14 P
Bind off and join (sew) to lower front section.
Cami: back Work in est patt (as for front)
Shape body: back
Row 1 (RS) K3, SSK, K to last 5 sts, K2tog, K3
Rep this 1st row every 4 - 5 (RS) rows until 13 sts dec on each side… 95 sts on ndle
Approx dec rows as folls: 1, 5, 9, 13, 17, 21, 25, 29, 33, 37, 41, 45, 49
Work straight for 18 rows. Bind off. Weave in ends. Block. 
Note: the back features patt only at bottom – the top ends in St st bind-off.
If you prefer, (or if the p2tog tbl is driving you insane) you may apply this concept to the front - just add the same number of rows as for the back and bind off in St st. Alternatively, you may do a plain rib bottom and apply the design to the front bodice only.
Straps
Crochet 2 chain st straps and sew. I had a seamstress run me up two pure silk 'spaghetti' straps. I also made a casual, multi coloured version and used the crochet straps mentioned above.

:: click here for more options
:: http://black-dog-knits.blogspot.com
Ooh, that's such a pretty tank and I have perfect yarn for it (maybe - what gauge did you have?). I might have to put it in the queue!
ReplyDeleteI was just thinking the same thing as emily. :) what was you gauge! this is so cute!
ReplyDeletetruly beautiful.
ReplyDeleteGorgeous, gorgeous, gorgeous!
ReplyDeletetruly beautiful
ReplyDeleteWhat size is it? Or did I totally miss that? It's kind of late where I am...long day...
ReplyDeleteIt's gorgeous. Can we see it on a person?
Does the cami cover a strapless bra?
Forgive me, I'm curious!
It comes out to 43 inches around as written (121 x 2 = total stitches around, divided by 22.5 and multiplied by 4 gives you the number of inches... and yes I used the calculator, I hate math!)
ReplyDeleteThe pattern is lovely, can't wait to give it a go!
The only problem I see is when my husband looked over my shoulder when I was viewing this and went.."SEXY! Hey, you'd look good in a green and red one!" Alas...those socks will have to wait ;).
ReplyDeletehi, this cami looks great, but i have a question, when knitting, this instead of binding off the 'shaped body front' can i just continue and knit the top section straight on to it?
ReplyDeleteThanks
Tigger: the pattern is shaped at the bottom which makes it ideal as a 'hem'. The bodice requires the shaping to be at the top.
ReplyDeleteHey - I just started knitting the cami and am doing the decreases every five rows. Do I decrease on row 1, and then row 5; or on row 1, then row 6. Thanks for the feedback and for the beautiful pattern
ReplyDeleteDec as folls:
ReplyDeleteRow 1 (RS): Dec
Row 2: P across
Row 3: K across
Row 4: P across
Row 5: Dec
Use the following as a guide:
Dec Rows: 1, 5, 9, 13, 17, 21, 25, 29, 33, 37, 41, 45, 49
Missgragoo: the length measurement from the bottom to the top bind-off edge is 14 inches (35.5cm). Add another 3 inches (7.5cm) for the top/front bodice. Hope this helps - let me know if it doesn't.
ReplyDeleteHi love the cami, but am a self taught knitter. I have a bust of 42" how would i change the pattern to fit me. Chriss
ReplyDeleteHi Nora
ReplyDeleteI said it before and will say it again, great patterns. I am about to purchase yarn for Cami (decided on the Noro Lily, your version is stunning!) but was wondering what length 4mm cirular to get? Does it matter??
I've been silently stalking this pattern for several weeks, but I HAVE to make it! I'm off to the yarn store right now!
ReplyDeleteI have a question about how many stitches to cast on when starting. Maybe I counted wrong but it seems like the lacy pattern is repeated over 25 stitches, not 23, so if you're making 5 reps of the pattern plus 3 stiches on each side shouldn't it be cast on 131 stitches? If you get a chance to email me that would be super. banickle*at*yahoo.com I'm probably just overlooking the obvious.
ReplyDeleteAnonymous: please advise your email details and I'll send you a revised copy of this pattern.
ReplyDeleteKaren: the CO sts are correct as the patt reps over 23 sts (you're counting the YOs).
ReplyDeleteNora
Thank you so much, I love the cami with jeans. I have some Jo Sharp soho summer cotton in a soft grey I'm going to give a go.
ReplyDeleteCoryn.
Hi Nora,
ReplyDeleteI emailed before about been a self taught knitter. Do you have a revised copy of the pattern in a larger size? My email address is
chrisspicc@hotmail.com
Thanks
i've just started my cast on for this cami. i am knitting in the round with the circs, however, am i knitting the 3 knit sts at the beginning and end of each round?? or am i to mark the front and back of the cami and adapt the stitch count to knit the 3 sts at the beginning and end of the front and back??? am i making my question clear as mud???
ReplyDeleteI am also a self-taught knitter who is extremely interested in making this top for a 38" bust.
ReplyDeleteCould you e-mail me (kreipke*at*yahoo*dot*com) with instructions on how to modify the pattern so I could get it to work for me?
Thanks soo much!! This pattern is gorgeous!
Hi, I have a question too - I'm about to start the top front bodice, and I was wondering whether there should be two knit rows before Round 1, just as there are at the bottom? I can't tell from the picture.
ReplyDeleteThanks for the pattern, by the way! I can't wait to finish it - it's coming out very nicely.
Hi ! I love this pattern ! but I'm also a big girl , is there any possible way I can have this pattern with instructions on how to modify the it emailed to me ? My email is strapoprho. at . yahoo.com
ReplyDeleteYoure such a lovely person to share your work.
thanking you in advance
Poppy
Painterlass: YES! I've updated the pattern accordingly. Thank you.
ReplyDeletePoppy and anon (kreipke):
ReplyDeleteTo modify the pattern for larger sizing, you can either add an extra repeat or extra sts per side.
Alternatively, you can use larger needles and a 10 ply cotton (as opposed to the suggested 8 ply).
Thanks, Nora!
ReplyDeleteI'm going to be knitting this up soon, and was wondering... would it make sense to put the stitches for the bottom on a stitch holder, then do a 3-needle bindo off with the top part? Since the ends of both sections are what get sewn together? I'll do almost anything to avoid seaming. :D Gorgeous top, btw! I can't wait to knit it up.
ReplyDeleteZanne:
ReplyDeleteTechnically, a 3-ndle-BO will work but will create bulk.
A better option is to graft the sts or seam as per my instructions. This will create a flat seam which is what you want for the bodice.
I have made the beaded cami (without the beads). Thank you so much for a lovely pattern.
ReplyDeletePictures are in my blog.
It is very feminine!
ReplyDeletethis is one of the most beautiful patterns i have seen :-)
ReplyDeletebut like quite a few of the others id like to have the adjustments for a 38" bust. i would be so grateful....... my email is jwynne13@yahoo.com
thanks in advance
I knew in my mind what sort of thing I wanted and searched the internet for ages and ages.... then, Eureka! I found this pattern. It is gorgeous! Thank you, I've already started it. :)
ReplyDeleteI have also been stalking this pattern for awhile but i am 42" bust. Is it possible to email me a copy of the pattern with these measurements? pryor.jennie@gmail.com
ReplyDeleteThanks so much!!!!
really fabulous looking! Great work.
ReplyDeletebeautiful cami! would love to have copy of the modified pattern for a 42" bust too ceylang@swbell.net
ReplyDeleteOoh, this is really pretty. Thank you for sharing.
ReplyDeleteThis is soooo lovely...
ReplyDeleteCould someone be kind and send me this in a size 42" as well? thanks a lot.. my e-mail is felicia@qcn.com.sg
Just about to begin this beautiful pattern! Read through all the comments so i hope I'm not repeating a question.. my bust is only a 30" and i measured across and it only in 16", should i cast on 115sts or less? thanks:)
ReplyDeletehere's my e-mail just incase, aimes_k@hotmail.com
To modify for larger sizing, you can either add an extra pattern repeat or extra sts per side.
ReplyDeleteAlternatively, you can use larger needles and/or a 10 ply cotton (as opposed to the suggested 8 ply).
To modify for smaller sizing, go down a needle size or decrease the number of side sts.
:: Remember, the pattern requires 115 sts minimum.
Re: circular knitting
ReplyDeleteI'd recommend knitting this pattern in 2 separate pieces - the shaping isn't as defined when knit in the round. [It's only 2 seams!] :)
Also, the front bodice definitely needs to be knit separately and attached.
For those wishing to proceed in the round, I'd suggest a 60cm circular needle.
i am a normal-sized girl with a 43" bust. would it be possible to get a modified pattern? i'm so anxious to give this a try...it's quite pretty, and in texas it's almost warm enough to wear!
ReplyDeletein advance, thanks bunches!
ginnydm@yahoo.com
I'm getting ready to make this, and I'm wondering if the 18" length is with or without the straps.
ReplyDeletealso, do you know if anyone has charted the lace pattern?
Thanks! (elizab on ravelry)
Hello just a question, there are these explanations in French, your modele me interresse enormément, it is magnificent, good continuation, and in the pleasure
ReplyDeleteHi!!!! your desings are lovely, I like this especially and I have linked it in my blog in one of the Sunday's Project. If you don't mind I have also used one of your pictures to ilustrate the post ( I gave credit to you, of course. If it is a problem, just tell me and I will remove the pic and the link. Thanks!!!!
ReplyDeleteThe link is here: http://lolita-blahnik.blogspot.com/2008/09/sundays-project.html
ReplyDeleteI would really like to make tis cami but I'm size 38. Can I find this pattern somewhere in 38? Or could you e-mail me the changes for my size please? If it's not to much trubble.
ReplyDeleteMy e-mail is: domilenart@gmail.com
Thank you
May I also have th pattern change for a size 38? My email is kmbrown1@carolina.rr.com. Thanks!
ReplyDeleteI would also love the 38" size.
ReplyDeletetaimiylinen@hotmail.com. Thanks!
I am just doing the bodice section and it seems it should be k1 or p1 each end, not k3 or p3 - had to frog the first pattern row and work it out.
ReplyDeleteThanks Caroline!
ReplyDeleteFor those wanting larger/smaller sizes:
ReplyDeleteI had a laptop crash two years ago, so the revised pattern is no longer available. If anyone has made a larger/smaller size please email me your notes.
In the meantime:
To modify for larger sizing, you can either add an extra pattern repeat or extra sts per side.
Alternatively, you can use larger needles and/or a 10 ply cotton (as opposed to the suggested 8 ply).
To modify for smaller sizing, go down a needle size or decrease the number of side sts.
:: Remember, the pattern requires 115 sts minimum.
Thank you so very much for the beautiful pattern. A question: When CO for knitting in circular, do I still need to add 3 extra stitches per side, or is it enough just to double the amount of stitches in pattern repeats and go with it?
ReplyDeleteI would love to be able to use this in a scarf. Is that possible? If so, how would I do it?
ReplyDeleteThis is a great pattern, does anyone have a modified version of it in a larger size? If so would you please email it to me chanda.kim1@gmail.com, Thanks so much
ReplyDeleteThis is the perfect summer top. Absolutely gorgeous! Were you able to recreate the larger size? If possible, I'd like the 38/39 bust size... My e-mail is inkenandmalcolm@msn.com,
ReplyDeletethanks so much!
A lovely pattern - I can't wait to wear this!
ReplyDeleteI've finished the bodice and the bottom, knit in the round. But I haven't a clue how to seam this together. Any advice on technique? Do I overlap them, or sew with right sides together, etc?
Thanks!
Sew with right sides tog. Do not overlap.
ReplyDeleteGuys, to modify the pattern for larger sizing, you can either add an extra repeat or extra sts per side.
ReplyDeleteAlternatively, you can use larger needles and a 10 ply cotton (as opposed to the suggested 8 ply).
This IS a spectacular looking cami and I would like to make one in size XL; any ideas for doing that? I'd appreciate it.
ReplyDeleteInteresting article, added his blog to Favorites
ReplyDeleteI, of course, a newcomer to this blog, but the author does not agree
ReplyDeletewell damn, i thought i could get a sewing pattern for this xD oh well. hmm wonder if i can manage this on a smaller scale...
ReplyDeleteVery Nice, excited about making this, can you please send me the adjusted pattern for 38" bust? Thank you kindly. My e-mail is vlewis@bccz.com
ReplyDeleteDue to a computer crash, alternate sizing is no longer available...
ReplyDeleteVery interesting! I have no expert, but I want have to know more and more, on your blog just interesting and useful information.
ReplyDeleteI was interested know about it.
ReplyDeleteI know it's been over three years since the last comment, but I've only just come across this fantabulous (!!) pattern. Did you finally get the adjustments for larger sizes up, or was that lost in your computer crash?
ReplyDeleteI understand the extra stitches bit for larger sizes, but what about the decreases, if the person is taller as well?
Thanks for sharing this absolutely fabulous, delicious pattern. I intend to make one for my daughter and each of my nieces and look forward to posting the photographs here, if I may!
Thank you again. And again, lol!!!!
Lalita
I started on the cami, did the first part of the front, but i find that the scalloped edge rolls up.
ReplyDeleteAm I doing something wrong?
Help, please!
For those of you wanting alterations to the pattern, here is a site that might help you. While it may seem daunting at first it's a worthwhile skill to add to your craft. http://www.craftsy.com/blog/2014/03/tips-for-altering-knitting-patterns/
ReplyDelete