Tuesday, May 06, 2008


Black on Black


Wool: 100g x 3 *
Needles: 8mm (US11)

Gauge
3 sts and 5 rows per inch.

Finished measurements
Width [at hemline]: 26" [52" around]
Bust: 21" [42" around]
Length: 18"


Front
and back [make 2]
CO 70 sts

K 18 rows in St st

Next row [RS] K3, SSK, K to last 5 sts, K2tog, K3

K 18 rows

Next row K3, SSK, K to last 5 sts, K2tog, K3

K 13 rows… piece should measure approx 30cm


Shape raglan armholes

With RS facing, bind off 6 sts at beg of next 2 rows… 54 sts

Next row [RS] K2 K2tog, K to last 4 sts, K2togtbl, K2

Next row P

Rep last 2 rows 2 times more… 48 sts

Next row K2, K2tog, K to last 4 sts, K2togtbl, K2

Next row P

Next row K

Next row P

Rep last 4 rows 5 times more… 36 sts

Next row K2, K2tog, K to last 4 sts, K2togtbl, K2

Next row P… 34 sts

Bind off rem 34 sts using 9mm needles


Sleeves [make 2]

CO 30 sts

K 4 rows in St st

Next row Inc 1 st at ea end of this and every foll 10th row to 38 sts, then every foll 8th row to 42 sts

K 3 rows and then K an inc row… 44 sts

Cont straight until sleeves meas 40cm ending with a WS row


Shape raglan

Bind off 6 sts at beg of next 2 rows… 32 sts

Next row [RS] K2, K2tog, K to last 4 sts, K2togtbl, K2

Next row P

Next row K

Next row P

Rep last 4 rows 4 times more… 22 sts

Next row K

Next row P

Next row K2, K2tog, K to last 4 sts, K2togtbl, K2… 20 sts

Next row P

Next row K

Next row P

Next row K

Next row P

Next row K2, K2tog, K to last 4 sts, K2togtbl, K2… 18 sts

Next row P

Next row K

Bind off rem 18 sts

* I used merino wool from my stash [purchased in France a few years ago], but the garment has since been test knitted using Cascade 220.

Tuesday, February 19, 2008


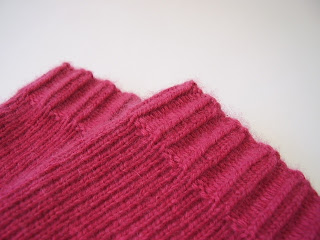
A little bit of decadence


Yarn
Sophia 4-ply sock yarn by Posh Yarn in Raspberry – pure cashmere : 55g / 185m x 2

Needles
2.75mm (US 2) : set of 4 DPN. Adjust needle size if necessary to obtain the correct gauge.

Notions
Markers (m); tapestry needle

Gauge
15sts and 22 rnds = 5cm in stocking stitch worked in the rnd.

Stitch guide -- Twisted rib
All rnds: *K2 through the back loop (tbl), P2; rep from * to end of rnd.

Instructions
CO 60 sts and work 18 rnds of twisted rib pattern.
Cont in stocking st for 55 rnds or until desired length.

Heel
Divide heel and instep sts
Place 31 sts on holder for instep
Work heel flap on 29 sts
Row 1 K3, *Sl 1, K1 to last 4 sts, Sl 1, K3
Row 2 K3, P23, K3
Rep these two rows until flap measures approx 6.5cm

Turn heel
Work short rows to shape heel as folls:
Row 1 Sl 1, K16, K2tog tbl, K1, turn.
Row 2 Sl 1, P5, P2tog, P1, turn.
Row 3 Sl 1, K to 1 st before gap formed on previous row, K2tog tbl, (1 st each side of gap), K1, turn.
Row 4 Sl 1, P to 1 st before gap formed on previous row, P2tog, (1 st each side of gap), P1, turn.
Rep rows 3 and 4 until all heel sts have been worked… 18 sts rem

Shape gussets
Pick up sts along selvedge edges of heel flap and rejoin for working in the rnd as folls:
Rnd 1 With needle 1, K18 heel sts then pick up and knit 16 sts along side of heel flap; with needle 2, K across 31 instep sts; with needle 3, pick up and knit 16 sts along other side of heel flap – 81 sts total; 25 sts each on needle 1 and 3; 31 instep sts on needle 2. Rnd begins at centre of heel.
Rnd 2 On needle 1, K to last 3 sts, K2tog, K1; K across needle 2; on needle 3, K1, SSK, K to end – 2 sts dec’d.
Rnd 3 K
Rep rnds 2 and 3 until 60 sts rem.

Foot
Cont in St st until foot measures 6.5cm less than desired foot length.

Toe
Rnd 1: On needle 1, K to last 3 sts, K2tog, K1; on needle 2, K1, SSK, K to last 3 sts, K2tog, K1; on needle 3, K1, SSK, K to end – 4 sts dec’d.
Rnds 2 – 4 K
Rnd 5 Rep rnd 1

Rnds 6 and 7 K
Rnd 8 Rep rnd 1
Rnds 9 and 10 K
Rnd 11 Rep rnd 1

Rnd 12 K
Rnd 13 Rep rnd 1

Rnd 14 K
Rnd 15 Rep rnd 1
Rnd 16 K
Rep rnd 1 only until 12 sts rem

Finishing
Kitchener st to graft sts tog. Weave in ends. Block lightly.

Friday, August 31, 2007


Soft enclosures


A quick, beautifully crafted item that is perfect for gifts or when you need instant gratification.
Choose butter-soft wools that drape and fold around the body : Fine, lightweight fabrics in interesting textures : Unexpected materials give interest to simple shapes : Neutrals teamed with red or olive tones work best – or keep it simple with graphic black and white.

Materials

▪ 1.5m main fabric
▪ co-ordinating fabric pieces
▪ matching thread
▪ brooch

Instructions

The instructions below do not allow for seam allowances. Please remember to add approx 1cm seams (or less) for each join. Please check the diagram for finished measurements and adjust accordingly.

1. Cut and machine stitch the co-ordinating cotton strips according to the measurements in the diagram below – ensure that they are approx 20cm wide after seam allowances.

2. Measure the main fabric and cut a strip that is 20cm wide and 95cm long (not including seams).

3. Machine stitch the strips and main fabric together. This is the front piece.

4. Measure the back fabric against the front piece (it should be 20cm wide approx 125cm long, not including seams).

5. With RS tog, pin both pieces all the way around, leaving a gap of approx 10cm [for turning]. Machine stitch both sides together [but not the gap], leaving a seam allowance of approx 1cm.

6. Press lightly, clip each corner diagonally and turn the scarf RS out through the gap.

7. Push out all 4 corners, slip stitch the gap closed and press lightly.

8. Gently drape around your neck and fasten with a modern – style brooch (or make your own here).

Tuesday, June 05, 2007


Stella


You’ll need 6mm (US 10) needles and 8mm (US 11) needles; button; snap fastener; tapestry needle; thread

Yarn –700g wool (100g = 210y/192m), silk, cotton or any yarn that gives you the following tension over 1 inch of Stocking stitch:
Tension
6mm (US 10) needles – 1 inch: 5 sts and 5 rows
8mm (US 11) needles – 1 inch: 3 sts and 4 rows

Finished measurements
Length 70cm (27.5 in)
Width (across hem) 66cm (26in) – this is the widest part
Sleeve length 42 cm (16.5in)

Abbreviations
KFB an increase made by knitting into the front and back of the same st.


Back
Using 8mm (US 11) needles, CO 80 sts and work 1 row in K1, P1 rib.
Next row (RS) P
Next row K
Rep these two rows until piece meas approx 13 cm (19 k rows), ending with a P row facing.

Shape body
Next row P3, P2tog, P to last 5 sts, P2tog tbl, P3
Rep this row every 8 (or so) rows until 5 sts have been dec’d per side (10 total sts)… 70 sts

Change to smaller needles and cont in reverse stocking st for 12 rows.

Shape armholes
Cast off 4 sts at beg of next two rows… 62 sts
Dec 1 st at end of next 6 rows… 50 sts
Cont straight for 42 rows, ending with a P side facing.
Cast off all sts in K st

Front RS
Using 8mm needles, CO 50 sts and work 1 row in K1, P1 rib.
Next row P
Next row K
Rep these two rows until piece meas approx 13 cm (19 k rows) ending with a P row facing (as for the back).
Next row P to last 5 sts, P2tog tbl, P3.
Rep this row every 8 (or so) rows until 5 sts have been dec’d on ONLY ONE SIDE -- the side where your seam will be… 45 sts.
Cont until the front piece is equal with the back (approx 56 P rows) ending with a P row. Change to smaller needles. Cont in reverse st st for 4 – 5 more rows.
Next row P to last 5 sts, P2tog tbl, P3
Next row K
Begin neck shaping – start your button hole here (optional) – I used a button and snap fastener. Next row P2tog, P to end
Next row K
Rep these two rows 3 times more – or until you’ve worked 15 P rows (in total) from when you changed needles.

Begin shaping armhole AT THE SAME TIME as you’re shaping the v-neck.

Shape armholes
Cast off 4 sts at beg of next K row
Next row P2tog, P to end
Dec 1 st at beg of next 6 K rows…
Cont straight (dec ONLY at neck-line) for 16 more rows and then cont dec ONLY every 2nd row.
Cont in this manner for 56 rows from where you changed needles, ending with a P side facing.
Cast off rem sts in K st

Front LS
Using 8mm needles, CO 50 sts and work 1 row in K1, P1 rib.
Next row P
Next row K
Rep these two rows until piece meas approx 13 cm (19 k rows) ending with a P row facing (as for the back).
Next row P3, P2tog, P to end.
Rep this row every 8 (or so) RS rows until 5 sts have been dec on ONLY ONE SIDE -- the side where your seam will be… 45 sts.
Cont until the front piece is equal with the back (approx 56 P rows) ending with a P row. Change to smaller needles. Cont in reverse st st for 4 – 5 more rows.
Next row P3, P2tog, P to end.
Next row K

Begin neck shaping
Next row P to last 2 sts, P2tog
Next row K
Rep these two rows 3 times more – or until you’ve worked 15 P rows (in total) from when you changed needles.

Begin shaping armhole AT THE SAME TIME as you’re shaping the v-neck.

Shape armholes
CO 4 sts at beg of next P row, P to last 2 sts, P2tog.
Next row K
Dec 1 st at beg of next 6 P rows, P to last 2 sts, P2tog.
Cont straight (dec ONLY at neck-line) for 16 more rows and then cont dec ONLY every 2nd row.
Cont in this manner for 56 rows from where you changed needles, ending with a P side facing.
Cast off rem sts in K st


Sleeves (make 2)
Using smaller needles, CO 50 sts and work 1 row in K1, P1 rib.
Next row P
Next row K
Rep these two rows 5 more times (11 total rows) ending with a K row facing.
Inc row KFB, K to last st, KFB
Next row Beg with a K row, inc 1 st at ea end
Work 5 rows
Inc row
Work 5 rows
Inc row
Work 3 rows
Inc row
Work 2 rows
Inc row
Work 5 rows
Inc row
Work 3 rows
Inc row
Work 5 rows
Inc row
Work 2 rows
Inc row
Work 5 rows… 68 sts
Inc row
Work 3 rows
Inc row
Work 1 row
Inc row
Work 3 rows
Inc row
Work 2 rows… 76 sts


Shape top
Cast off 4 sts at beg of next 2 rows… 76 sts
Cont straight for 6 rows.
Work 1 row, ending with a P row facing.
Cast off rem sts (in K)

Making
up
Press all pieces very gently , on WS, using a warm iron over a cloth.
Join shoulder seams. Set in sleeves, join side and sleeve seams. Add button and snap fastener.

Saturday, February 24, 2007


Zakka pouch

Knitted base

You'll need: 50g Rowan 4ply cotton (2 strands held tog); set of 5mm (US 8) DPNs

Tension: approx 5sts/in

Using 5mm DPNs and holding 2 strands of yarn tog, CO 88 sts. Divide evenly on 4 needles and join for knitting in the round.

Rnd 1: K
Rep rnd 1 until piece measures approx 6cm.

Next rnd: *K2, P1, K to last 2 sts on needle, P2tog; rep from * for rem 3 needles - 84 sts rem.

Rnds 2, 4, 6, 8, 10, 12 and 14: K

Rnd 3: *K3, P1, K to last 2 sts on needle, P2tog; rep from * for rem 3 needles - 80 sts rem

Rnd 5: *K4, P1, K to last 2 sts on needle, P2tog; rep from * for rem 3 needles - 76 sts rem

Rnd 7: *K5, P1, K to last 2 sts on needle, P2tog; rep from * for rem 3 needles - 72 sts rem

Rnd 9: *K6, P1, K to last 2 sts on needle, P2tog; rep from * for rem 3 needles - 68 sts rem

Rnd 11: *K7, P1, K to last 2 sts on needle, P2tog; rep from * for rem 3 needles - 64 sts rem

Rnd 13: *K8, P1, K to last 2 sts on needle, P2tog; rep from * for rem 3 needles - 60 sts rem

Rnd 15: *K9, P1, K to last 2 sts on needle, P2tog; rep from * for rem 3 needles - 56 sts rem

Rnd 16: *K to last 2 sts on needle; P2tog; rep from * for rem 3 needles - 52 sts rem

Rep rnd 16 until 12 sts rem (3 sts per needle). Break yarn, leaving an 8" (20.5cm) tail. Thread tail through rem sts, pull tight and fasten off on the WS. Weave in ends.


Body

You'll need: main fabric and lining; drawcord (ribbon, braid etc); tapestry needle and thread

1. Measure the circumference of the base and cut main fabric and lining accordingly (allow 1.5cm seam allowance). Use contrasting fabric for pockets and sew onto the lining.

2. Place main fabric and lining with RS facing each other and machine sew all the way around, leaving a 5cm gap at both top corners (for the drawcord) and a 15cm gap at one of the bottom corners.

Tip: Cut fabric with pinking shears to avoid over-locking the sides or fiddling with French seams.

3. Push/flip through the larger opening so that the RS is now facing you. Use a knitting needle to push the corner out and hand stitch closed. Do not stitch the 2 x 5cm gaps at the top.

4. Draw cord tube: Machine sew approx 4cm down from the top (from one gap to the other).

5. Iron the fabric before attaching it to the knitted base.

6. Hand stitch the fabric onto the knitted base, bringing both sides around to form a circle. Join. Hand or machine stitch closed.

7. Measure and cut drawcord/ribbon (ensure you have enough length to tie). Fasten a safety pin onto one side of the ribbon and push through the tube.


:: An alternative to the knitted base is a basket:


Body

Repeat steps 1 - 5 (above)


6. Before affixing the fabric onto the basket, try and pin it into place (as best as you can). Thread a tapestry needle with 3 strands of embroidery cotton and with RS facing you, sew the fabric onto a single ridge (weave) of the basket. Be careful not to snag/snap the cotton. Repeat approx 3 - 4 times for each stitch, threading the needle between the main fabric and lining to the next ridge, until you've sewn all the way around the basket. Join both sides together and hand stitch the seam closed.

7. As for knitted base (above).


Black Dog Knits

Saturday, January 20, 2007

Zakka Sac

:: Zakka are small, general products used in everyday life. The term zakka has also come to represent a minimalist style of art and craft – items that are simple, charming and of Japanese aesthetic.

:: There are many alternatives to making a drawstring pouch. For me, this is the quickest method (less than 1 hr - including the knitting) and I like how it uses the lining as a contrast.

:: If the bag is finished neatly (no exposed seams, hanging threads etc), it’s reversible!

You’ll need:


  • yarn
  • fabric and lining
  • draw cord – ribbon, braid etc
  • matching thread
  • knitting needles
  • tapestry needle
  • sewing machine or hand held hemmer

:: I used: Rowan Handknit DK cotton in red for the base and linen fabrics for the body.

Method
This will make a 16 cm wide sac:

1. Using 5mm knitting needles CO 30 sts and work in garter st until piece measures 12 cm. Bind off.

Using tapestry needle and matching yarn, fold piece in half and sew both sides. Iron lightly on WS.

2. Measure piece across the top and cut both fabrics in accordance with this size (don't forget your seam allowance - approx 2cm).
My knitted piece was 18cm across the top, therefore I cut 2 x W20cm fabric pieces.


3. Place main fabric and lining with RS facing each other and machine sew all around the square, leaving a 10cm gap at one of the bottom corners.

Tip: Cut fabric with pinking shears to avoid over-locking.

4. Push/flip through the opening so that the RS is now facing you. Use a knitting needle to push the corner out and hand stitch closed.

5. Drawcord section – you can use my method (below) or this alternative

I folded the top part of the pouch over so that it contrasts with the lining. Sew across but do NOT sew the edges as this is where you’ll thread your drawcord.


6. Iron the fabric before attaching to the knitted base.

7. Hand stitch or machine sew the fabric all the way around the knitted base. Join to form a tube and hand stitch closed.
8. Measure and cut drawcord/ribbon. Fasten a safety pin onto one side and push through the tube.

That's it!


Black Dog Knits

Monday, November 27, 2006


Donyale

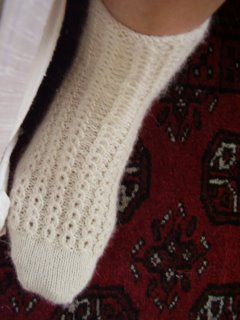
Beneath a garter st border, ribs of purl st separate eyelet cables to create a pretty lace sock.

A simple 4 row pattern repeat knit from the cuff down.

Eyelet cable socks free pattern here